CAMS User Guide
Asset Set-Up and Administration
This section of the user guide describes how to:
- Add, edit, and delete assets
- Add, edit, and delete assets owners
- Create links between assets to show their dependencies.
Adding, Editing, & Deleting Assets
Add an asset
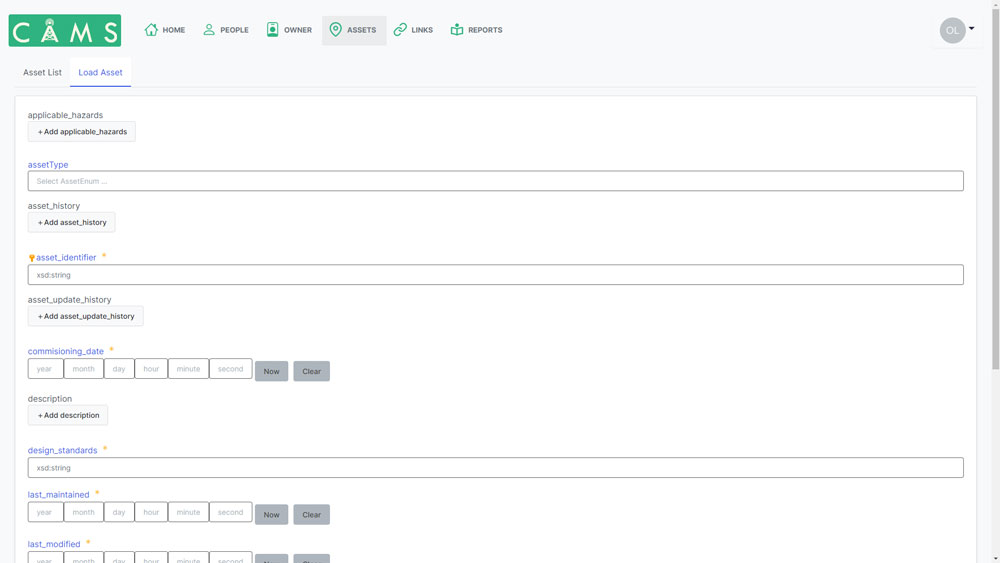
To add an asset, do the following:
- From the top menu, select assets.
- Choose “Load Asset”. When adding an asset, you can enter the following information about the asset (items in bold are essential for CAMS to function):
- Applicable Hazard (note you can add multiple applicable hazards)
- Select the button and expand the section.
- Enter maximum severity grade (must be a number)
- Select a hazard from the dropdown list
- Asset Type – When adding an asset, you can enter the following information about the asset.
- Asset History – You can add multiple asset histories, which describe when the asset was updated/upgraded and/or past event impacts. To add an asset history, do the following:
- Choose either “Hazard Event” or “Update Event”.
- Add a descriptive note in the comment field to help other users understand the history.
- Add the date and time of the event or update.
- If you selected “Update Event”, select the hazard from the dropdown list
- Asset Identifier – This is the asset name in the database and must be unique. The asset name will often suffice.
- Commissioning date – The date when the asset first started operating.
- Description – Add a description of the asset to help other users understand it better.
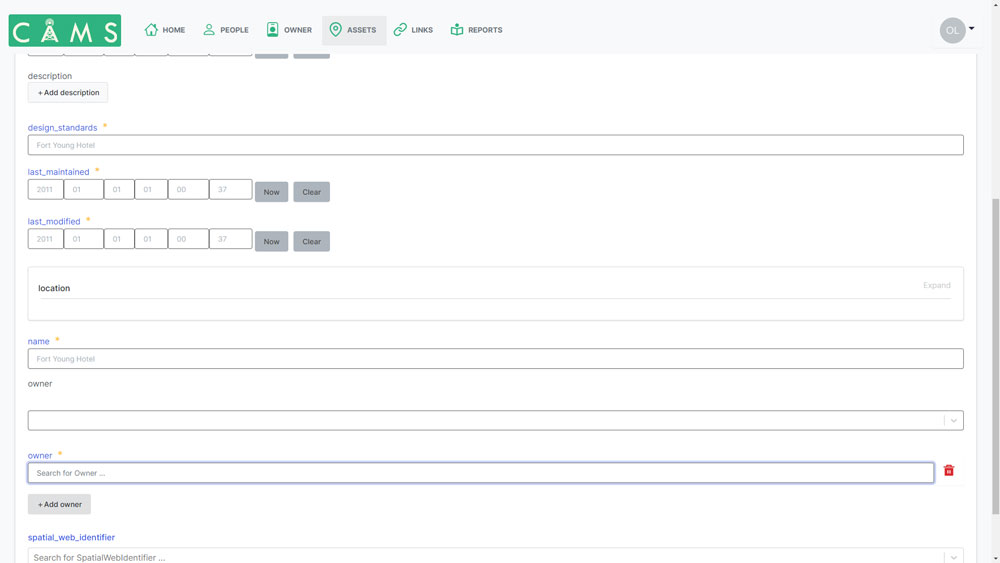
- Design standard – A description of any applicable design standards used to construct the asset.
- Last maintained – Date and time when the asset was last maintained.
- Last modified – Date and time when the asset was last modified.
- Location – The physical location of the asset. To add a location, expand the section and select and edit one or more of the following:
- City
- Latitude
- Longitude
- Type: Point on the map
- Postal code/Zip code
- State
- Street
- Name – The name displayed when you view the asset on the map. This can be the same name as the asset identifier, but may vary if, in the unlikely event, that you have two assets with the same name. The asset identifier must always be unique for the database to distinguish between assets.
- Owner – The asset owner who should be contacted in case of an emergency. To add an asset owner, do the following:
- Select the asset owner button.
- Search for available owners. The owner must already be in the database first (See the next section for details on how to add an owner).
- Click on the owner to add them.
- Applicable Hazard (note you can add multiple applicable hazards)
- Once all of these details are correct, hit the ‘Submit’ button to add the asset. More detail on some of these items is included below.
Edit an Asset
You can edit existing asset information. To edit an asset, do the following:
- From the top menu, select “Assets”.
- From the tab below, select “Asset List”.
- Find the asset that you want to edit and click on it.
- In the top right corner, select ‘edit’.
- Edit the fields that you wish to change.
- At the bottom of the screen, press “Submit”.
Delete an Asset
Warning: When deleting assets, any associated links will also be removed.
You can delete an existing asset. To delete an asset, do the following:
- From the top menu, select “Assets”.
- From the tab below, select “Asset List”.
- Find the asset you want to delete and click on it.
- In the top right corner, select “Delete”.
People & Owners
To assign owners to an asset, you must first create a person and then an owner. Once you’ve created a person, you can then create an owner and link that owner directly to the details for that Person.
Create a New Person
To create a new person, do the following:
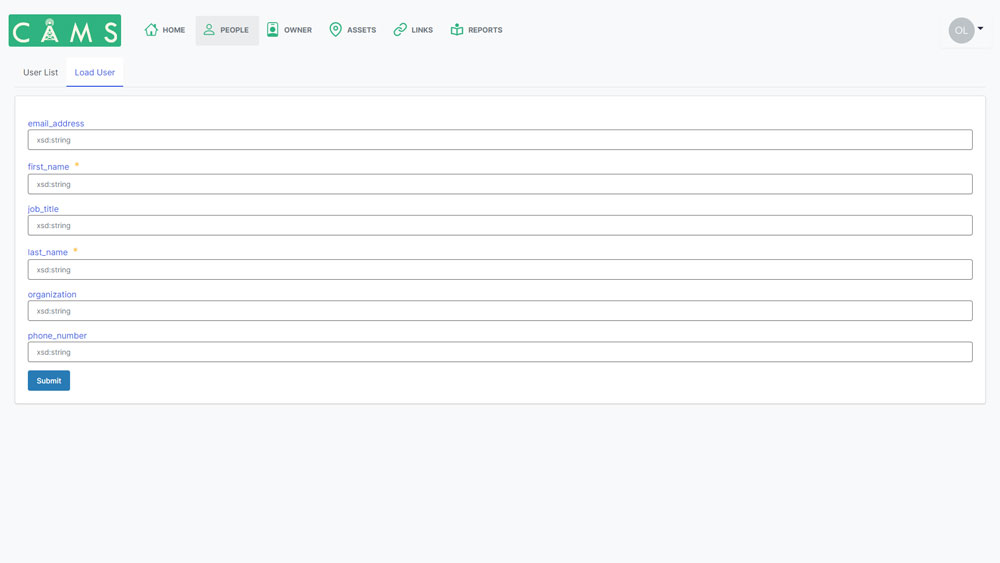
- From the top menu, select “People”.
- From the tab below the top menu, select “load user”.
- Enter the following information:
- Email address
- First name
- Job title
- Last name
- Organization
- Phone number
- Click “Submit”.
Edit a Person
To edit existing person information, do the following:
- From the top menu, select “People”.
- From the tab below the top menu, select “User List”.
- In the dropdown, click on the person that you wish to edit.
- In the top right corner, click “Edit” and make your changes.
- Click “Submit”.

Create a New Asset Owner
Important: Before you can create a new asset owner, you must create a new person. To create a new person, see the “Create a New Person” section above.

To create a new asset owner, do the following:
- From the top menu, select “Owner”.
- From the tab below the top menu, select “Load Owner”.
- From the list of available persons, search for the person that you wish to add as owner.
- Enter a name for the owner. This could be an actual name (Bill, Mary, Jim, etc.) or, if you don’t wish to share such information, an organization name (Albuquerque Police Department, City of Albuquerque, etc.).
- Click “Submit”.
Edit an Asset Owner
To edit an existing Owner, do the following:
- From the top menu, select “Owner”.
- From the tab below the top menu, select “Owner List”.
- Click on the owner you wish to edit.
- In the top right corner, click “Edit” and make your changes.
- Click “Submit”.
Assign an Owner to an Asset
You can add multiple owners to an asset. To add an owner to an asset, do the following:
- From the top menu, select “Assets”.
- From the tab below the top menu, select “Asset List”.
- Click on the asset you want to add an owner to.
- Click “Edit”.
- Scroll down to the “Add Owner” button and click on it.
- Search for the owner you wish to add and click on it.
- Click “Submit”.
To add additional owners to the asset, repeat the process described above.
Asset Dependency Links
Creating dependency relationships between assets is essential to using CAMS effectively. If necessary, you can establish many dependencies between one asset and multiple assets. This section explains how to create a new dependency link and edit an existing dependency link.
Create New Dependency Link
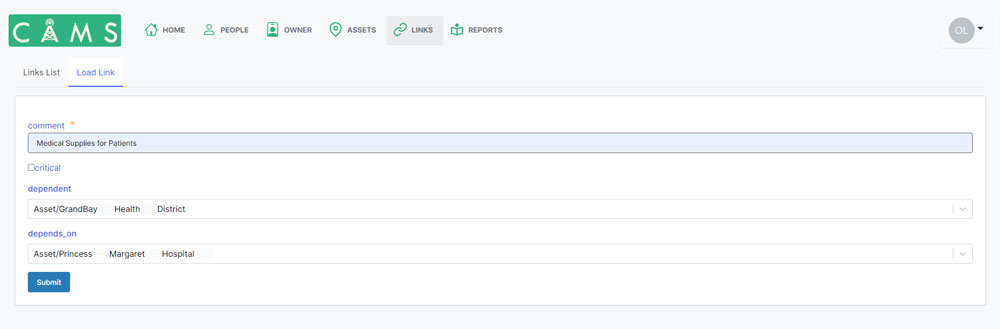
To create a new dependency link, do the following:
- From the top menu, select “Links”.
- From the tab below the menu, select “Load Link”.
- Add a note to explain the link to other users.
- If the link is a critical link, select the checkbox.
- Choose the dependent link by typing the asset name and selecting it from the displayed list.
- Choose the asset that the selected asset depends on by typing an asset name and selecting it from the displayed list.
- Click “Submit”.
Repeat the process described above to add more dependency links to the asset.
Edit Dependency Link
To edit an existing dependency link, do the following:
- From the top menu, select “Links”.
- From the tab below the menu, select “Links List”.
- Click on the link you wish to edit.
- In the top right corner, click “Edit” and make your desired changes.
- Click “Submit”.
Using CAMS
Initial Log In
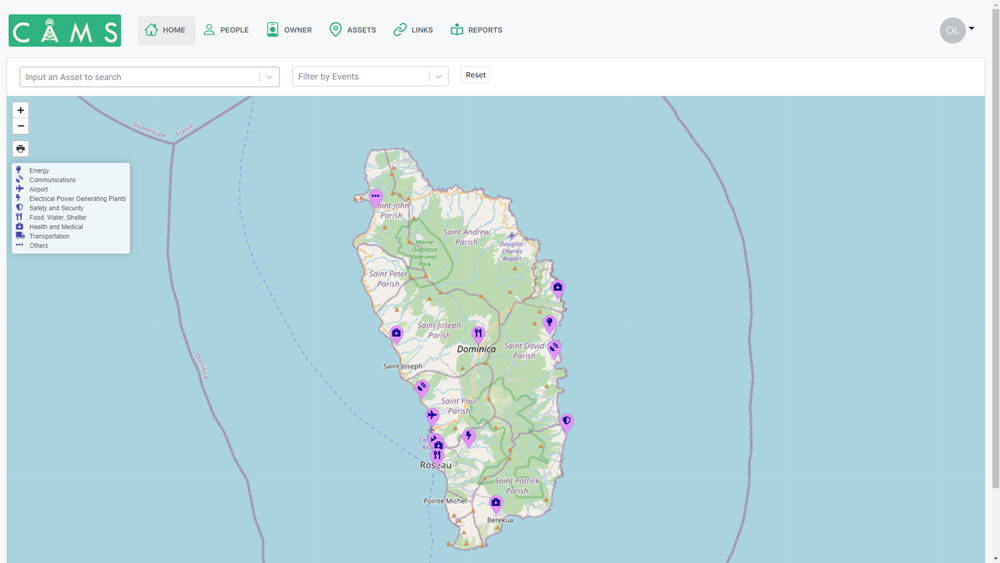
As an authorized user, you will see a map with all critical assets listed when you first log in to CAMS. This default view, called the All Asset View, features all of the critical assets listed within the system.
Assets are marked using different symbols. Each symbol corresponds to a different category of asset. To understand what each symbol corresponds to, use the key displayed next to the map
To view the asset name and location of an asset marker, hover over the marker. A pop-up displays the asset name, along with its latitude and longitude.
To view more asset details, click on the asset marker. Available asset information, such as owner, maintenance history, and owner(s), display in a sidebar. We’ll discuss the details in the sidebar later in the guide.
Display Failure Chains
A failure chain is a representation of the relationship between critical assets where, if one asset fails, it has an impact on the operation of an asset further downstream. Failure chains are displayed on the map.
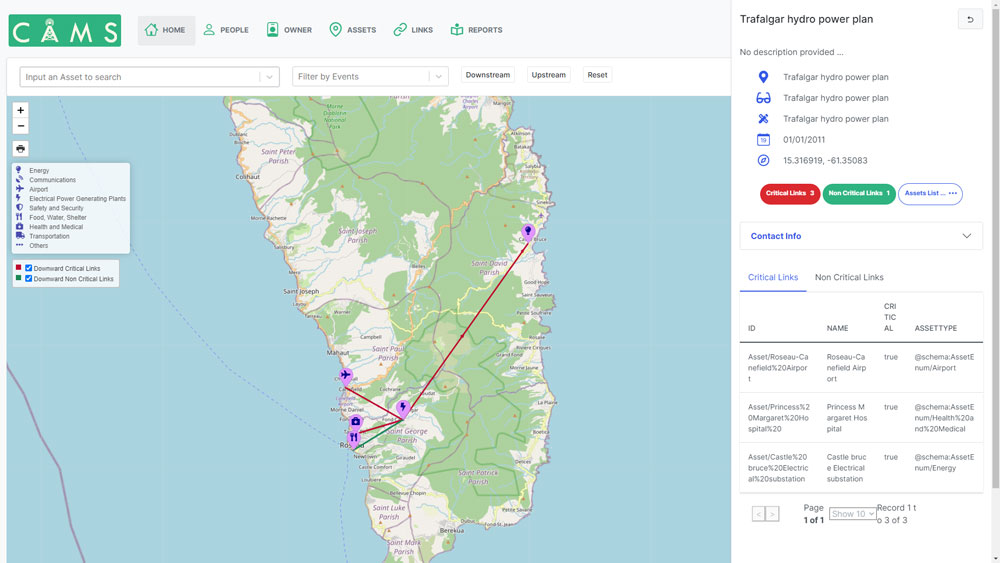
To display the direct failure chains from an asset, select the asset marker on the map. Depending on the selected asset, you will see one of the following:
- If the failure of the displayed asset will impact other assets downstream, arrows from that asset to other assets in the failure chain display.
- Green arrows indicate that the impacted asset is a non-critical asset.
- Red arrows indicate that the impacted asset is a critical asset.
- If the asset has no direct dependencies, no arrows appear.
To see which assets the selected asset is dependent upon, click the “Upstream” button in the top menu. A black arrow showing what the selected asset is dependent on displays. The directional lines show the cascading failure chain further up from that asset.

Display Cascading Failure Chains
Cascading failure chains are a representation of how the failure of one critical asset failing can affect multiple assets beyond those in its immediate failure chain(s).
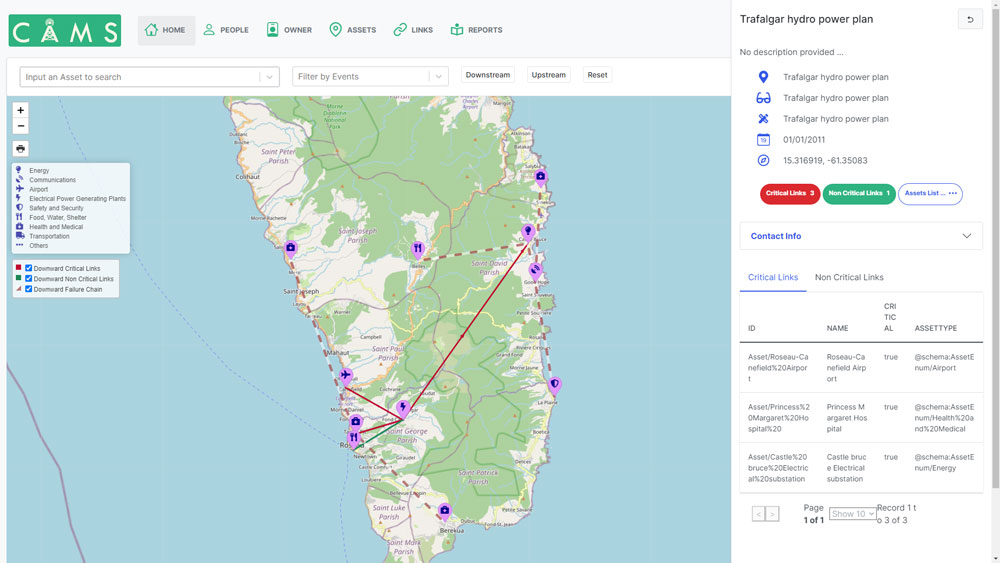
To view the cascading failure chain for a particular asset failure, do the following:
- Select an asset marker.
- In the top menu bar, click the “Downstream” button.
Animated lines showing the direction of the failure chain to other assets indicate the impact of an asset failure.
Filter by Asset

CAMS provides search functionality, which allows you to filter by asset. To filter by asset, do the following:
- In the top left corner, type the name of the asset you want to view. The search bar will auto-populate when you have added at least three letters. For example, if you type “air”, assets with “airport” and “airfield” in their names appear.
- From the dropdown list, select the asset you want to view. The asset appears on the map.
Note the following:
- You can display the asset information and failure chain by clicking on the asset marker.
- If you want to see the cascading failure chain, choose the “Downstream” button.
Filter by Event
Using CAMS search functionality, you can filter by a particular event to show its impact. This can be useful if:
- You know that a particular event (hurricane, derecho, etc.) is forecasted for the near future and you want to understand its potential impact.
- You are creating long-term plans for a theoretical disaster event in the near future.
To filter by event, do the following:
- From the top menu, select the down arrow in the events search bar. Alternatively, in the search bar, begin typing the name of a particular event (i.e. hurricane). A dropdown list of events displays.
- From the dropdown, select the event you wish to filter on by clicking on it. The map displays assets impacted by that event.
Note the following:
- The color of the asset markers vary based on the severity options for an event. For example, if you are filtering by a “hurricane” event, you will see 5 possible asset colors. In this example, the colors reflect the Saffir–Simpson hurricane scale, which specifies categories 1 through 5.
- You can toggle the display to show different severity levels using the bar on the top menu. When a particular event severity is selected, CAMS will only display assets impacted by that event severity.
- Once you have selected an asset, you can view the asset owner details, failure chains, upward links, and cascading failure chains.

Asset Details & Owners
To view the details and owners of an asset, click on an asset marker.
A sidebar will appear with details about that asset, these include:
- Name of the asset
- Asset Identifier – Database ID
- Design standards
- When it was last maintained
- Coordinates
- Contact owner and contact details
- List of critical and non-critical links associated with that asset.
Reset Map
Once you’ve viewed an asset, you will need to reset the map to view another asset.
To do this, press the ‘Reset’ button in the top menu.
Print Map
If you want to print the results of the map, complete any of the actions listed above to create your desired map. For example, you could create a map showing all assets affected by a Category 3 hurricane, along with failure chains and cascading failure chains.
Once you’ve created the map, do the following:
- On the left, click the ‘Print Icon’ button.
- Choose either portrait or landscape orientation.
Zoom In And Out on the Map
You can zoom in and out to get a closer view of assets and their relationships.
To zoom in or out, you can do one of the following:
- Use the + and – symbols in the top left corner.
- If you are using a mouse with a scroll wheel, use the scroll wheel on your mouse.
- If you have a trackpad, use two fingers on the trackpad.
- If you are using a mobile phone or tablet with a touch screen, pinch in or out with your fingers on the screen.
Move the Map
You can move the map around to get a better view of assets and their relationships.
To move the map around, click and hold your left mouse button and drag the map in the direction you wish to view.
User Management
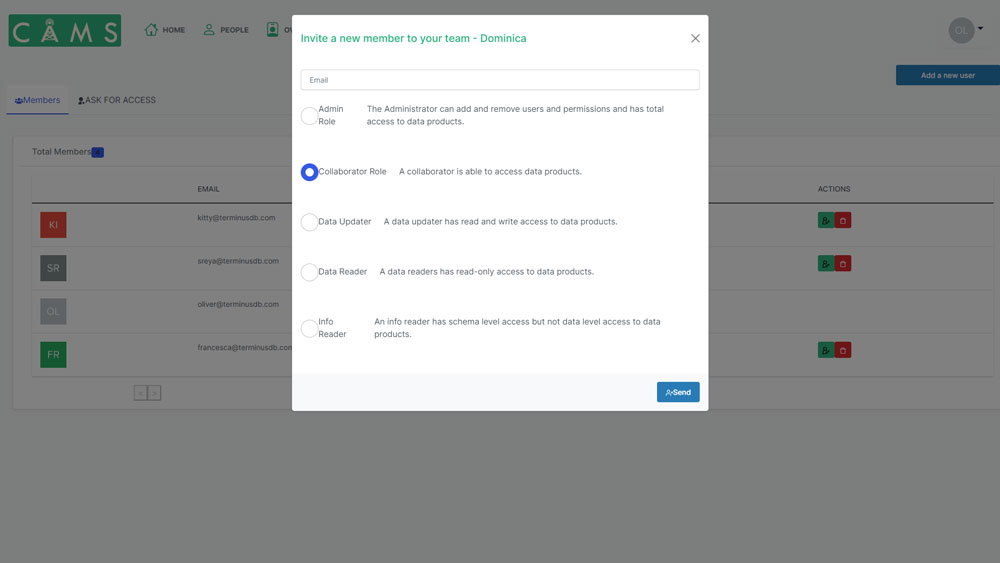
CAMS provides a variety of user management and administration features. Users can have a variety of roles within the system. These roles, along with their abilities, are listed below:
- Administrator – Can add / remove users and assign / revoke user permissions. Administrators have full read and write access to all assets and links. Administrators will be set up by the CAMS team prior to the implementation of the system.
- Collaborator – Can add, edit, and delete assets, links and associated data.
- Data Updater – Can add, edit, and delete assets and their associated data and create links between assets.
- Data Reader – Can view data on the map such as asset failure chains and asset information. A data reader cannot add, edit or remove assets and their links.
- Info Reader – Can access the CAMS schema, but cannot access to data within the application
CAMS requires new users to ask for access and administrators can either approve or deny access to these requests. This section explains how the user management and administration of the system work.
Manually Adding New Users
To manually add a new user to CAMS, do the following:
Note: You must be an Administrator to manually add a new user.
- In the top right corner, click on your user icon.
- From the dropdown, choose “User Management”.
- Select the “Members” tab.
- In the top right corner, select “Add a new user”.
- Add the email address of the user you wish to add.
- Assign role permissions.
Once the user has been added, they will receive an email with a login link. Once the new user clicks the link, they can set their password for secure access.

Approving/Rejecting User Access Requests
Non-users of the CAMS system can request access. When a non-user requests access:
- The CAMS administrator receives an email informing them of the request.
- The request is added to the “Ask for Access” list in the “User Management” section
- The administrator can decide whether to grant the requester access or not.
To approve or reject a CAMS user request, do the following:
Note: You must be an Administrator to approve or reject an access request.
- In the top right corner, click on your user icon.
- From the dropdown, choose “User Management”.
- Select the “Members” tab.
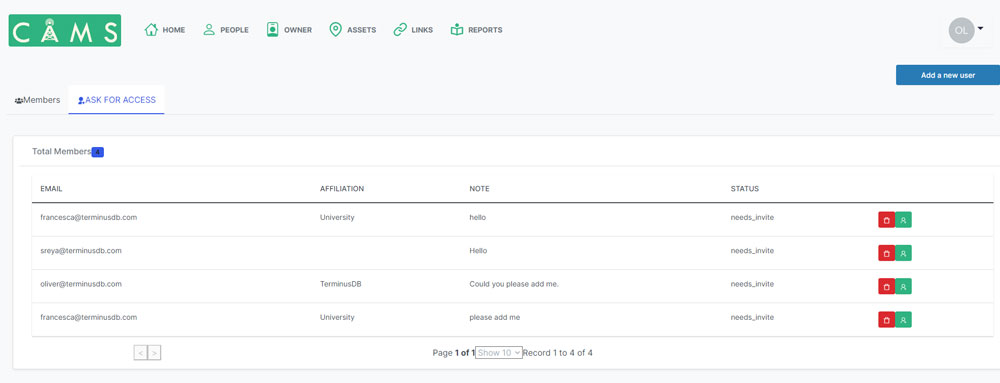
- Select the “Ask for Access” tab. A list of people who have requested access to CAMS displays.
- From this point, you can either accept or reject the user request.
- To accept the user request, click the green person icon.
- In the popup box, select a role for the new user.
- Click “Send”
- To reject and delete the user request, click the red bin button.
Once a user has been added, they will receive an email with a login link. Once the new user clicks the link, they can set their password for secure access.
Editing User Permissions
To edit permissions for an existing user, do the following:
- In the top right corner, click on your user icon.
- From the dropdown, choose “User Management”.
- Select the “Members” tab.
- From the list of available members, select the user whose permissions you want to change
- Click the green person icon.
- Select the permission you want to add
- Click “Send”.
Deleting Users
To delete an existing user, do the following:
- In the top right corner, click on your user icon.
- From the dropdown, choose “User Management”.
- Select the “Members” tab.
- From the list of available members, select the user that you want to delete
- Click the red bin icon.
Requesting Access
To request access to an implementation of the CAMS system, do the following:
- Navigate to https://dashboard.climateresilient.world/yourTeamName
- Fill in the form.
- Click “Submit”
Once approved, you will receive an email with a login link. By clicking the link, you can set your password for secure access.